
JSF Template
Огляд: У цій статті ми будемо обговорювати про реалізацію JSF (JavaServer Faces) шаблони. Дизайн шаблону є важливим аспектом будь-якого веб-додатки. Template is a re-usable component which is used to make web UI development easy and faster.
Введення: JavaServer Faces is a java based framework for mainly UI component development. It is a server side technology as the states of the UI components are maintained in the server. The UI components are having their own defined life cycle and it follows the java enterprise edition standards (Java EE standards). JSF applications run in a web or application server like tomcat, weblogic, websphere, jetty etc.
JSF Template: A template can be defined as a common interface layout with same style and feature. A template is made as a re-usable component and it is used in all the pages of the application. The advantages of using template are
- Re-usability of the common layout
- Faster development
- Easier maintainability
- Easier enhancement/ modification
- Used as a plug-in component
JSF template is also having the above features. Following are some common facelets tags for providing common features on the UI layer. In the following section I will describe the functionalities of each and every tag.
- ui:insert: Як випливає з назви, it is used in a template and indicates what to be inserted in the template. It uses a ‘name’ attribute to identify the included page.
Listing 1: Sample displaying insert operation
[код]
<ui:insert name=”header” >
<ui:include src=”header.xhtml” />
</ui:insert>
[/код]
- ui:define :This tag is used to define the content/text to be inserted/replaced with a matching ui:insert tag. It actually replaces the default value (present in the template) with a custom content.
Listing2: Sample displaying define operation
[код]
<ui:define name=”header”>
<h2>Custom header text</h2>
</ui:define>
[/код]
- ui:include: This tag is used to simply include the content of one xhtml page into another xhtml page. This is just like ‘jsp:include’ tag in jsp pages.
Listing3: Sample displaying include operation
[код]
<ui:insert name=”content” >
<ui:include src=”contents.xhtml” />
</ui:insert>
[/код]
- ui:composition: This particular tag has two features. If it is used with a ‘template’ attribute, then it loads the template. The children of this tag are used to define the layout of the template. This tag can also be used to define the group elements and then these group elements are used inside the template.
Listing4: Sample displaying the usage of composition
Usage1: In template mode
[код]
<ui:composition template=”templates/commonheader.xhtml”>
<ui:define name=”header”>
<h2>Custom page 1 header</h2>
</ui:define>
</ui:composition>
[/код]
Usage2: In component mode
[код]
<body>
<ui:composition>
<h1>Default common header</h1>
</ui:composition>
</body>
[/код]
Following diagram shows the general components of a JSF template
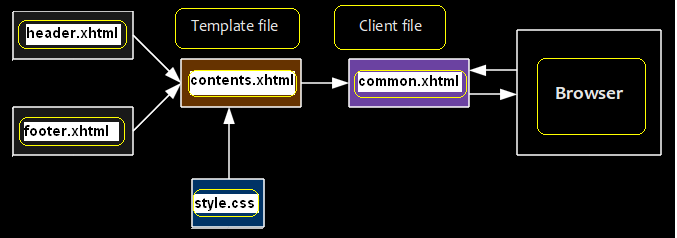
Architecture of JSF template
Figure 1: Common architecture of a JSF template
In the following section we will discuss the step by step process to define a JSF template.
Step One: Here we will first create the header component of the template. Later this header component will be plugged-in with the template page. The content is a default one and will be replaced in the actual implementation with custom content. The composition tag has been used to define the header component.
Listing5: Sample displaying header component (header_name.xhtml)
[код]
<ui:composition>
<h1>Default header component</h1>
</ui:composition>
[/код]
Step Two: In step two we will create the footer component. Same composition tag will be used to define the footer.
Listing6: Sample displaying footer component (footer_name.xhtml)
[код]
<ui:composition>
<h1>Default footer component</h1>
</ui:composition>
[/код]
Step Three: In this step we will create the content file. The actual content will be replaced in the template later in the actual implementation. Again composition tag is used to define the content.
Listing7: Sample displaying content component (contents_name.xhtml)
[код]
<ui:composition>
<h1>Defaults content page</h1>
</ui:composition>
[/код]
Step Four: In this step we will create the template file (template.xhtml) with header.xhtml, footer.xhtml and contents.xhtml. These three components will be plugged into the template file which is another (.xhtml) файл,. We will use ui.insert and ui:include to add the components. The name attribute of the ui:insert tag will be used to identify the corresponding section and replace the content.
Listing8: Sample displaying template (template.xhtml)
[код]
<h:body>
<ui:insert name=”header_name” >
<ui:include src=”header_name.xhtml” />
</ui:insert>
<ui:insert name=”content_name” >
<ui:include src=”contents_name.xhtml” />
</ui:insert>
<ui:insert name=”footer_name” >
<ui:include src=”footer_name.xhtml” />
</ui:insert>
</h:body>
[/код]
Step Five: In this step we will show how to load the template file in a page (home_page.xhtml). In the first example we will load the template file with default content. And in the second example we will load the template and then override the default content ui: define tag. The ui: composition tag will be used in both the examples to load the template.
Listing 9: Sample loading the template with default content
[код]
<h:body>
<ui:composition template=”template.xhtml”>
</h:body>
[/код]
Listing 10: Sample loading the template with custom content
[код]
<h:body>
<ui:composition template=”templates/template.xhtml”>
<ui:define name=”content_name”>
<h:link value=”Page one” outcome=”page_one” />
 
<h:link value=”Page two” outcome=”page_two” />
</ui:define>
</ui:composition>
</h:body>
[/код]
Now in the following section we will create a complte example with all the components.
Create header: Create header file ‘header_comp.xhtml’. As described above this is the common component for header section of the UI layout. The application can use it directly or change the content with custom values.
Listing 11: Sample header file (header_comp.xhtml)
[код]
<?xml version=”1.0″ encoding=”UTF-8″?>
<!DOCTYPE html PUBLIC “-//W3C//DTD XHTML 1.0 Transitional//EN”
“HTTP://www.w3.org/TR/xhtml1/DTD/xhtml1-transitional.dtd”>
<html xmlns=”HTTP://www.w3.org/1999/xhtml”
xmlns:ui=”HTTP://java.sun.com/jsf/facelets”>
<body>
<ui:composition>
<h1>This is the default header file</h1>
</ui:composition>
</body>
</html>
[/код]
Create footer: Create footer file ‘footer_comp.xhtml’. As described above this is the common component for footer section of the UI layout. The application can use it directly or change the content with custom values.
Listing 12: Sample footer file (footer_comp.xhtml)
[код]
<?xml version=”1.0″ encoding=”UTF-8″?>
<!DOCTYPE html PUBLIC “-//W3C//DTD XHTML 1.0 Transitional//EN”
“HTTP://www.w3.org/TR/xhtml1/DTD/xhtml1-transitional.dtd”>
<html xmlns=”HTTP://www.w3.org/1999/xhtml”
xmlns:ui=”HTTP://java.sun.com/jsf/facelets”>
<body>
<ui:composition>
<h1>This is default footer page</h1>
</ui:composition>
</body>
</html>
[/код]
Create content page: The content file ‘content_comp.xhtml’ contains the content section of the UI layer. As described above this is the common component for content section of the UI layout. The application can use it directly or change the content with custom text.
Listing 13: Sample content file (content_comp.xhtml)
[код]
<?xml version=”1.0″ encoding=”UTF-8″?>
<!DOCTYPE html PUBLIC “-//W3C//DTD XHTML 1.0 Transitional//EN”
“HTTP://www.w3.org/TR/xhtml1/DTD/xhtml1-transitional.dtd”>
<html xmlns=”HTTP://www.w3.org/1999/xhtml”
xmlns:ui=”HTTP://java.sun.com/jsf/facelets”>
<body>
<ui:composition>
<h1>This is default content page</h1>
</ui:composition>
</body>
</html>
Create template page: The template file contains all the three components. It is basically assembling all the common components. Then the template will be loaded into the actual page as per the requirement. The contents can be changed with ui:define tag.
Listing 14: Sample template file (template_comp.xhtml)
[код]
<?xml version=”1.0″ encoding=”UTF-8″?>
<!DOCTYPE html PUBLIC “-//W3C//DTD XHTML 1.0 Transitional//EN”
“HTTP://www.w3.org/TR/xhtml1/DTD/xhtml1-transitional.dtd”>
<html xmlns=”HTTP://www.w3.org/1999/xhtml”
xmlns:h=”HTTP://java.sun.com/jsf/html”
xmlns:ui=”HTTP://java.sun.com/jsf/facelets”>
<h:head>This is the header</h:head>
<h:body>
<div style=”border-width:4px; border-color:black; border-style:solid;”>
<ui:insert name=”header_comp” >
<ui:include src=”/templates/header_comp.xhtml” />
</ui:insert>
</div>
<br/>
<div style=”border-width:6px; border-color:black; border-style:solid;”>
<ui:insert name=”content_comp” >
<ui:include src=”/templates/content_comp.xhtml” />
</ui:insert>
</div>
<br/>
<div style=”border-width:4px; border-color:red; border-style:solid;”>
<ui:insert name=”footer_comp” >
<ui:include src=”/templates/footer_comp.xhtml” />
</ui:insert>
</div>
</h:body>
</html>
[/код]
Create sample page: Now we will create a sample page using the template created above.
Listing 15: Sample page with the template (sample_page.xhtml)
[код]
<?xml version=”1.0″ encoding=”UTF-8″?>
<!DOCTYPE html PUBLIC “-//W3C//DTD XHTML 1.0 Transitional//EN”
“HTTP://www.w3.org/TR/xhtml1/DTD/xhtml1-transitional.dtd”>
<html xmlns=”HTTP://www.w3.org/1999/xhtml”
xmlns:h=”HTTP://java.sun.com/jsf/html”
xmlns:ui=”HTTP://java.sun.com/jsf/facelets”>
<h:body>
<ui:composition template=”templates/template_comp.xhtml”>
<ui:define name=”header_name”>
<h2>Sample header</h2>
</ui:define>
<ui:define name=”content_name”>
<h2>Sample content</h2>
<h:link value=”Будинки” outcome=”home_pg” />
</ui:define>
<ui:define name=”footer_name”>
<h2>Sample footer</h2>
</ui:define>
</ui:composition>
</h:body>
</html>
[/код]
Висновок: In this article we have discussed about the JSF components. We have also described different components of a template. At the end of the section we have built a complete page with a JSF template. Hope you have understood the basic concepts and enjoyed the article.