
In this article we will discuss about annotations and how they can be used in practical programming. First, we will discuss some conceptual ideas and then jump into coding to write an example program using annotations.
Motivation:
In Java programming, there are several methods to declare the behavior of different elements (like methods, classes, members etc). In most of the cases these declarations are defined in some external files (XML, properties file etc). And then those files are referred in the program to get it executed.
In case of annotation, the approach is totally different. Annotations are meta-data and those are written in a specific format. These annotation elements are written within the Java program itself. So, there is no need to refer any external files, which is a big advantage. Ці анотації прості у використанні і досить гнучкою, щоб реалізувати.
У наступному розділі ми побачимо, як вони можуть бути реалізовані.
Що таке Java анотацій?
Java, анотацій це метадані програми Java. Or, попросту кажучи, анотацію Java надає інформацію про програму Java. В більшості випадків, вона безпосередньо не впливає на програму або код.
Чому використовуються Java-анотацій?
Java, анотацію можна використовувати для наступних цілей:
- Надання інструкцій для компілятора
Коли компілятор перетворює код в машиночитаємих інструкцій, Анотації можуть надати такі інструкції компілятора. Usually, після компіляції, анотації немає в коді.
- Надання інструкції до будівельника
Ці дні, Ви дозволили б інструменти, такі як Apache Maven або Apache Ant для побудови коду. Annotations can be useful for build tools. When the build tools go about their tasks which include generating source code, generating XML files (e.g. deployment descriptors), packaging codes and files into a JAR file, it looks for the annotations for inputs on generating source code or files.
- Providing instructions to the software runtime
It is possible to define annotations for providing inputs to software runtime although such annotations can be accessed with Java Reflections, a different tool.
Annotations can be both predefined and custom. While custom annotations can be of many types, predefined annotations are of the following three types.
@Deprecated annotation indicates that a class, method or field that is no longer in use.
@ Override анотацію вказує на те, що клас у методі не відповідає будь-якої метод суперкласу. У разі невідповідності, компілятор видає помилку.
@SuppressWarnings анотацію пригнічує попередження, кинуті компілятором. For example, якщо метод викликає метод застарілий, компілятор генерує попередження. Анотацій пригнічує такі попередження і багато іншого.
Створення нашого першого проекту:
У цьому розділі ми створимо проект за допомогою Eclipse IDE. Приклад коду покаже, як анотацію працює в реальному середовищі. Перед тим як перейти в руки-на кодуванні нам необхідно виконати кроки установки, щоб зробити навколишнє середовище готовий.
Нижче наведено відомості про встановлення.
Step 1: Налаштування набір інструментальних засобів розробки Java
скачати JDK з сайту Oracle, встановити і налаштувати його. Потім встановіть PATH і JAVA_HOME змінні оточення.
Step 2: Налаштування Eclipse IDE
Download Eclipse from the official website. Install it and set the PATH variable.
Step 3: Download annotation packages from spring libraries.
In our example we will be using Spring annotation packages. скачати org.springframework.context.jar from the above link and put it in the lib folder in Eclipse IDE as shown below.

Spring packages
Figure1: Annotation Jars in lib folder
Now our environment is ready to write Java programs with annotations.
Let us create out first project by using Eclipse IDE.
Create a project in Eclipse and set the package name as com.techalpine.annotation. Under this package create three Java classes as shown below.
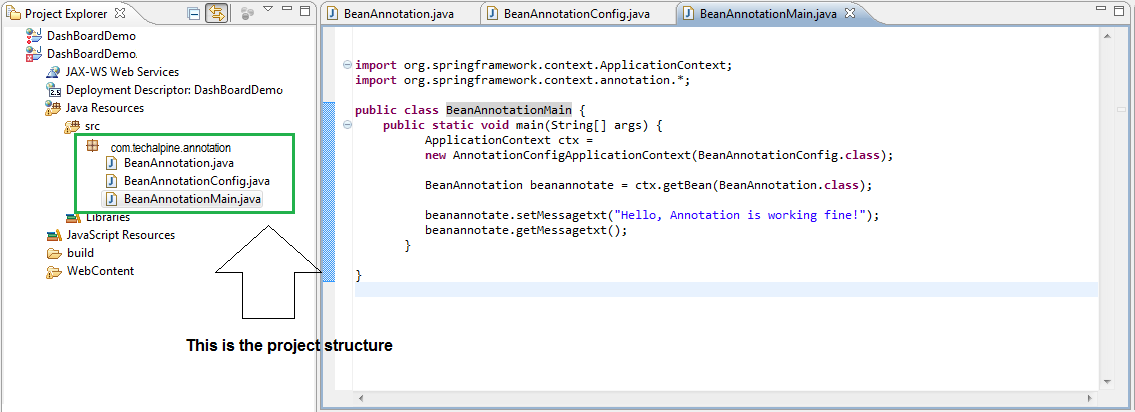
Project Structure
Figure2: Project structure
Three classes are BeanAnnotation.java, BeanAnnotationConfig.java and BeanAnnotationMain.java
Listing1: This is the bean class with getter and setter methods
[код]
package com.techalpine.annotation;
суспільного класу BeanAnnotation {
приватна Рядок messagetxt;
громадського недійсними setMessagetxt(рядок messagetxt){
this.messagetxt = messagetxt;
}
громадського недійсними getMessagetxt(){
System.out.println(“це повідомлення : ” + messagetxt);
}
}
[/код]
Наступний клас конфігурації з @Configuration і @боб анотації. Ці анотації визначить боб і інформувати контейнер для зв'язування.
Listing2: Це клас конфігурації
[код]
package com.techalpine.annotation;
імпортувати org.springframework.context.annotation. *;
@Configuration
суспільного класу BeanAnnotationConfig {
@Bean
громадського BeanAnnotation beanannotate(){
повернути новий BeanAnnotation();
}
}
[/код]
Далі основний клас для тестування анотацій і як він працює.
Listing3: Це основний клас
[код]
package com.techalpine.annotation;
import org.springframework.context.ApplicationContext;
імпортувати org.springframework.context.annotation. *;
суспільного класу BeanAnnotationMain {
державної статичної сили основних(Рядок[] аргументи) {
ApplicationContext CTX =
новий AnnotationConfigApplicationContext(BeanAnnotationConfig.class);
BeanAnnotation beanannotate = ctx.getBean(BeanAnnotation.class);
beanannotate.setMessagetxt(“Здравствуйте, Анотація працює відмінно!”);
beanannotate.getMessagetxt();
}
}
[/код]
виконання проекту:
Структура проекту завершена і готова до виконання. Тепер запустіть додаток, як показано нижче. Це буде окрема програма Java, тому він повинен бути запущений як додаток Java, як показано нижче.
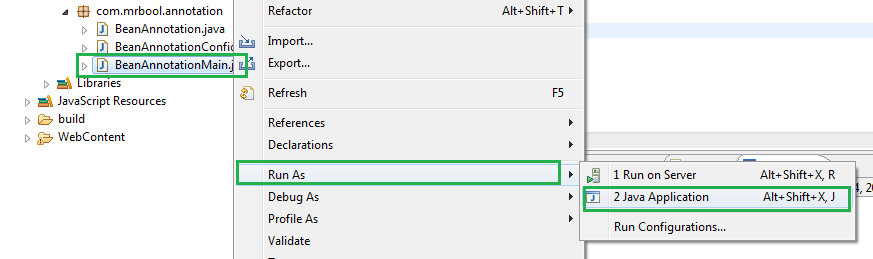
запуск програми
малюнок 3: запуск програми
Після того, як основна програма виконана, він покаже наступний висновок.

Output
Figure4: Відображення виведення на консолі
Висновок:
У цій статті ми розглянули поняття анотацію і як він може бути реалізований. Сподіваюся, що це допоможе користувачам писати Java-програми з анотаціями.