
In this article we will discuss about annotations and how they can be used in practical programming. First, we will discuss some conceptual ideas and then jump into coding to write an example program using annotations.
Motivation:
In Java programming, there are several methods to declare the behavior of different elements (like methods, classes, members etc). In most of the cases these declarations are defined in some external files (XML, properties file etc). And then those files are referred in the program to get it executed.
In case of annotation, the approach is totally different. Annotations are meta-data and those are written in a specific format. These annotation elements are written within the Java program itself. So, there is no need to refer any external files, which is a big advantage. These annotations are easy to use and flexible enough to implement.
In the next section we will see how these can be implemented.
What is Java annotation?
A Java annotation is a metadata of a Java program. Or, simply speaking, a Java annotation provides information about a Java program. In most cases, it does not directly influence the program or code.
Why Java annotations are used?
A Java annotation can be used for the following purposes:
- Providing instructions to the compiler
When the compiler converts the code into machine-readable instructions, annotations can provide the compiler such instructions. Usually, after compilation, the annotations are not present in the code.
- Providing instructions to the builder
These days, you would let tools like Apache Maven or Apache Ant to build the code. Pripisi lahko koristni za graditi orodja. Ko orodja graditi iti o svojih nalog, ki vključuje generiranje izvorno kodo, generiranje datoteke XML (e.g. uvajanje deskriptorji), pakiranje kode in datotek v datoteko JAR, išče opomb za vložke na ustvarjanje izvorno kodo ali datoteke.
- Zagotavljanje navodila za runtime programske opreme
Možno je, da se opredeli komentarje za zagotavljanje vložke v programski čas delovanja, čeprav je takšne pripombe mogoče dostopati z Java Razmišljanja, drugo orodje.
Pripisi lahko tako vnaprej določene in po meri. Medtem ko se lahko meri pripombe je veliko vrst, vnaprej določene pripombe so naslednje tri vrste.
@Deprecated pripomba kaže, da razred, Metoda ali polje, ki ni več v uporabi.
@ Override pripomba kaže, da razred v postopku ne ustreza nobenemu metode v nadrazreda. V primeru neujemanja, prevajalnik vrže napako.
@SuppressWarnings zaznambe zavira opozorila, ki jih prevajalnik vrže. For example, če je metoda kliče opuščeni metodo, prevajalnik vrže opozorilo. Pripomba zavira ta opozorila in več.
Ustvarjanje naš prvi projekt:
V tem poglavju bomo ustvarili projekt, s pomočjo Eclipse IDE. Kodo vzorca bo pokazal, kako označevanje deluje v realnem okolju. Pred vselitvijo v roke kodiranega moramo dokončati namestitev korake, da bi okolje pripravljeni.
Po so podrobnosti za namestitev.
Step 1: Vzpostavitev Java Development Kit
Prenos JDK iz mesta Oracle, namestitev in konfiguracijo. Nato nastavite okoljske spremenljivke PATH in JAVA_HOME.
Step 2: Nastavitev Eclipse IDE
Download Eclipse from the official website. Install it and set the PATH variable.
Step 3: Download annotation packages from spring libraries.
In our example we will be using Spring annotation packages. Prenos org.springframework.context.jar from the above link and put it in the lib folder in Eclipse IDE as shown below.

Spring packages
Figure1: Annotation Jars in lib folder
Now our environment is ready to write Java programs with annotations.
Let us create out first project by using Eclipse IDE.
Create a project in Eclipse and set the package name as com.techalpine.annotation. Under this package create three Java classes as shown below.
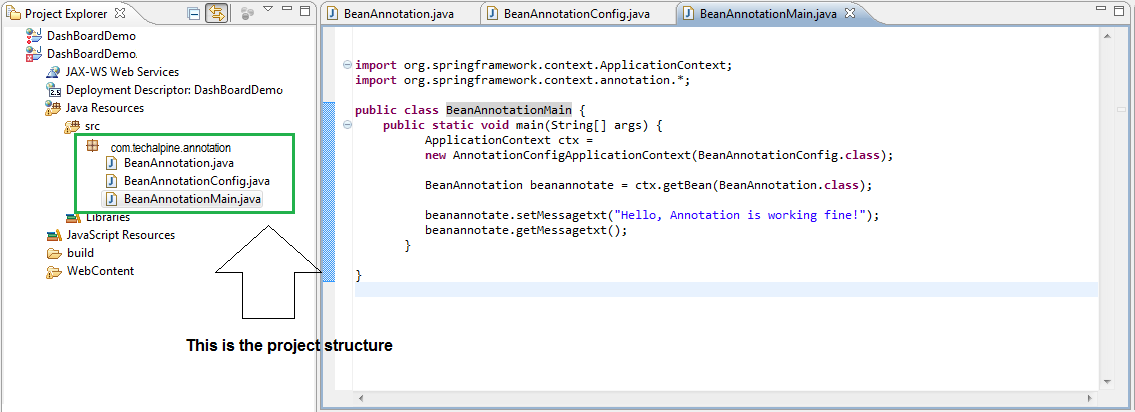
Project Structure
Figure2: Project structure
Three classes are BeanAnnotation.java, BeanAnnotationConfig.java and BeanAnnotationMain.java
Listing1: This is the bean class with getter and setter methods
[koda]
package com.techalpine.annotation;
public class BeanAnnotation {
private String messagetxt;
public void setMessagetxt(String messagetxt){
this.messagetxt = messagetxt;
}
public void getMessagetxt(){
Println(“This is the message : ” + messagetxt);
}
}
[/koda]
Next is the configuration class with @Configuration and @Bean annotations. These annotations will identify the bean and inform the container for binding.
Listing2: This is the configuration class
[koda]
package com.techalpine.annotation;
import org.springframework.context.annotation.*;
@Configuration
public class BeanAnnotationConfig {
@Bean
public BeanAnnotation beanannotate(){
return new BeanAnnotation();
}
}
[/koda]
Next is the main class to test the annotations and how it works.
Listing3: This is the main class
[koda]
package com.techalpine.annotation;
import org.springframework.context.ApplicationContext;
import org.springframework.context.annotation.*;
public class BeanAnnotationMain {
public static void main(String[] args) {
ApplicationContext ctx =
new AnnotationConfigApplicationContext(BeanAnnotationConfig.class);
BeanAnnotation beanannotate = ctx.getBean(BeanAnnotation.class);
beanannotate.setMessagetxt(“Hello, Annotation is working fine!”);
beanannotate.getMessagetxt();
}
}
[/koda]
Executing the project:
The project structure is complete and it is ready to execute. Now run the application as shown below. It will be a stand-alone Java program, so it has to be run as a Java application as shown below.
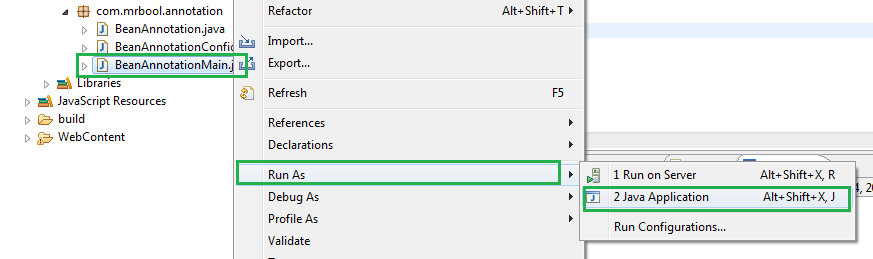
Run aplikacija,en
Figure3: Run the application
Once the main program is executed, it will show the following output.

Output
Figure4: Showing output on the console
Zaključek:
In this article we have discussed the concepts of annotation and how it can be implemented. Hope it will help the users to write Java programs with annotations.