
Во оваа статија ние ќе се разговара за прибелешки и како тие можат да се користат во практични програмирање. First, ќе разговараат за некои концептуални идеи и да скокне кодирање да се напише еден пример програма со користење на прибелешки.
мотивација:
Во Јава програмирање, постојат неколку методи за да се прогласи за однесувањето на различни елементи (како методи, classes, членовите и др). Во повеќето случаи овие изјави се дефинирани во некои надворешни датотеки (XML, својства поднесе итн). И тогаш овие датотеки се наведени во програмата за да ја извршува.
Во случај на коментар, пристапот е сосема поинаква. Ознаки се мета-податоците и оние кои се напишани во одреден формат. Овие коментар елементи се опишани во рамките на самата програма Јава. So, нема потреба да се однесуваат на било каков надворешен датотеки, што е голема предност. These annotations are easy to use and flexible enough to implement.
In the next section we will see how these can be implemented.
What is Java annotation?
A Java annotation is a metadata of a Java program. Or, simply speaking, a Java annotation provides information about a Java program. In most cases, it does not directly influence the program or code.
Why Java annotations are used?
A Java annotation can be used for the following purposes:
- Providing instructions to the compiler
When the compiler converts the code into machine-readable instructions, annotations can provide the compiler such instructions. Usually, after compilation, the annotations are not present in the code.
- Providing instructions to the builder
These days, you would let tools like Apache Maven or Apache Ant to build the code. Annotations can be useful for build tools. When the build tools go about their tasks which include generating source code, generating XML files (e.g. deployment descriptors), packaging codes and files into a JAR file, it looks for the annotations for inputs on generating source code or files.
- Providing instructions to the software runtime
It is possible to define annotations for providing inputs to software runtime although such annotations can be accessed with Java Reflections, a different tool.
Annotations can be both predefined and custom. While custom annotations can be of many types, predefined annotations are of the following three types.
@Deprecated annotation indicates that a class, method or field that is no longer in use.
@ Отфрли коментар укажува на тоа дека една класа во метод не се совпаѓа со кој било метод во суперкласа. Во случај на неусогласеност, компајлерот фрла грешка.
@SuppressWarnings коментар потиснува предупредувања фрлени од страна на компајлерот. For example, ако метод повици на неодобрени метод, компајлерот фрла предупредување. Коментар потиснува ваквите предупредувања и повеќе.
Креирање на нашиот прв проект:
Во овој дел ќе се создаде проект со користење на Eclipse IDE. примерокот кодот ќе се покаже како коментар работи во вистинска животна средина. Пред да се пресели во рацете на кодирање ние треба да го завршите инсталација чекори за да се направи на животната средина подготвена.
Следниве се деталите за инсталација.
Step 1: Поставување на Java развој комплет
Превземи JDK од местото на Oracle, инсталирате и конфигурирате. Потоа во собата патека и JAVA_HOME животната средина променливи.
Step 2: Поставување на Eclipse IDE
Преземете Eclipse од официјална веб-страница. Инсталирајте го и поставете PATH променливата.
Step 3: Превземи коментар пакети од пролет библиотеки.
Во нашиот пример ќе биде со користење на пролет коментар пакети. Превземи org.springframework.context.jar од врската погоре и го стави во lib папка во Eclipse IDE како што е прикажано подолу.

пролет пакети
Figure1: Анотација тегли во lib папка
Сега нашата средина е подготвен да пишува Java програми со прибелешки.
Дозволете ни да се создаде од првиот проект со користење на Eclipse IDE.
Се создаде проект во Eclipse и го постави името на пакетот, како com.techalpine.annotation. Во овој пакет се создаде три Java класи како што е прикажано подолу.
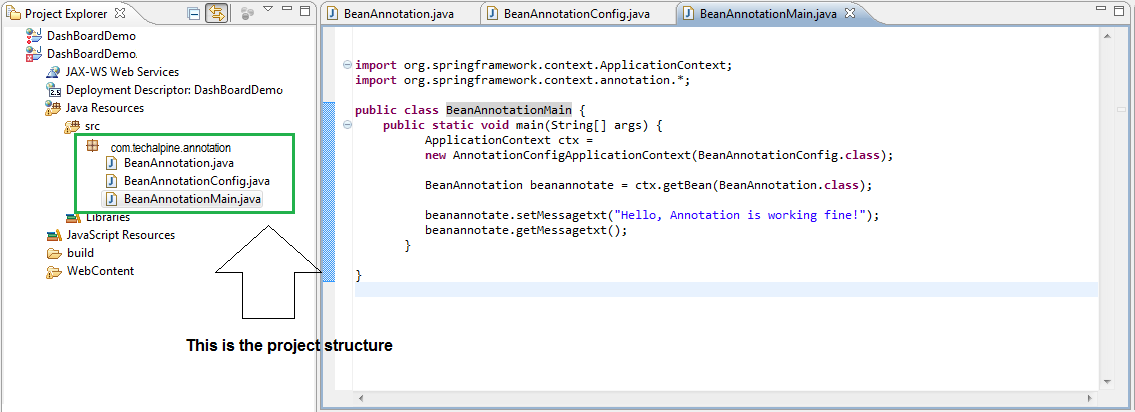
Структура на проектот
Figure2: структура на проектот
Три класи се BeanAnnotation.java, BeanAnnotationConfig.java и BeanAnnotationMain.java
Listing1: Ова е класа на грав со копач и словослагател методи
[код]
пакет com.techalpine.annotation;
public class BeanAnnotation {
private String messagetxt;
public void setMessagetxt(String messagetxt){
this.messagetxt = messagetxt;
}
public void getMessagetxt(){
System.out.println(“This is the message : ” + messagetxt);
}
}
[/код]
Next is the configuration class with @Configuration and @Bean annotations. These annotations will identify the bean and inform the container for binding.
Listing2: This is the configuration class
[код]
пакет com.techalpine.annotation;
import org.springframework.context.annotation.*;
@Configuration
public class BeanAnnotationConfig {
@Bean
public BeanAnnotation beanannotate(){
return new BeanAnnotation();
}
}
[/код]
Next is the main class to test the annotations and how it works.
Listing3: This is the main class
[код]
пакет com.techalpine.annotation;
import org.springframework.context.ApplicationContext;
import org.springframework.context.annotation.*;
public class BeanAnnotationMain {
public static void main(Стринг[] аргументи) {
ApplicationContext ctx =
new AnnotationConfigApplicationContext(BeanAnnotationConfig.class);
BeanAnnotation beanannotate = ctx.getBean(BeanAnnotation.class);
beanannotate.setMessagetxt(“Hello, Annotation is working fine!”);
beanannotate.getMessagetxt();
}
}
[/код]
Executing the project:
The project structure is complete and it is ready to execute. Now run the application as shown below. It will be a stand-alone Java program, so it has to be run as a Java application as shown below.
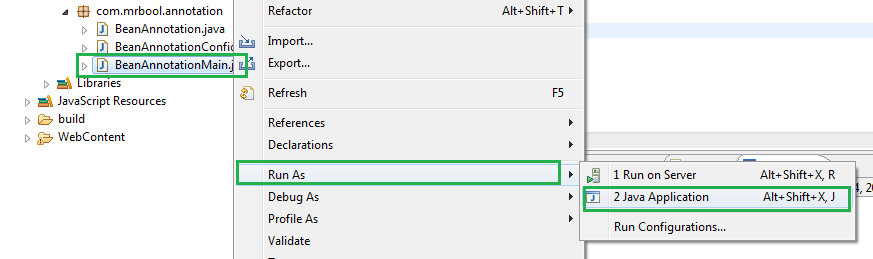
Run application
Figure3: Run the application
Once the main program is executed, it will show the following output.

Output
Figure4: Showing output on the console
Заклучок:
In this article we have discussed the concepts of annotation and how it can be implemented. Hope it will help the users to write Java programs with annotations.