
In this article we will discuss about annotations and how they can be used in practical programming. First, we will discuss some conceptual ideas and then jump into coding to write an example program using annotations.
Motivation:
In Java programming, there are several methods to declare the behavior of different elements (like methods, ຫ້ອງຮຽນ, members etc). In most of the cases these declarations are defined in some external files (XML, properties file etc). And then those files are referred in the program to get it executed.
In case of annotation, the approach is totally different. Annotations are meta-data and those are written in a specific format. These annotation elements are written within the Java program itself. So, there is no need to refer any external files, which is a big advantage. ຄໍາເຫຼົ່ານີ້ທີ່ໃຊ້ວຽກງ່າຍແລະປ່ຽນແປງໄດ້ພຽງພໍທີ່ຈະປະຕິບັດ.
ໃນພາກຕໍ່ໄປພວກເຮົາຈະເບິ່ງວິທີການເຫຼົ່ານີ້ສາມາດໄດ້ຮັບການປະຕິບັດ.
Java ຫມາຍເຫດແມ່ນສິ່ງທີ່?
A ບັນທຶກຫຍໍ້ Java ເປັນ metadata ຂອງໂຄງການ Java ເປັນ. Or, ພຽງແຕ່ການເວົ້າ, ເປັນບັນທຶກຫຍໍ້ Java ສະຫນອງຂໍ້ມູນກ່ຽວກັບໂຄງການ Java. ໃນກໍລະນີຫຼາຍທີ່ສຸດ, ມັນບໍ່ໄດ້ໂດຍກົງມີອິດທິພົນໂຄງການຫຼືລະຫັດ.
ເປັນຫຍັງຄໍາ Java ໄດ້ຖືກນໍາໃຊ້?
A ບັນທຶກຫຍໍ້ Java ສາມາດໄດ້ຮັບການນໍາໃຊ້ສໍາລັບຈຸດປະສົງດັ່ງຕໍ່ໄປນີ້:
- ໃຫ້ຄໍາແນະນໍາກັບການລວບລວມ
ໃນເວລາທີ່ຄອມໄພເລີແປງລະຫັດເຂົ້າໄປໃນຄໍາແນະນໍາເຄື່ອງ readable ໄດ້, ຄໍາສາມາດສະຫນອງການລວບລວມຄໍາແນະນໍາດັ່ງກ່າວ. Usually, ຫຼັງຈາກການລວບລວມ, ຄໍາແມ່ນບໍ່ປະຈຸບັນຢູ່ໃນລະຫັດ.
- ໃຫ້ຄໍາແນະນໍາກັບການກໍ່ສ້າງ
ວັນນີ້, ເຈົ້າຈະປ່ອຍໃຫ້ເຄື່ອງມືເຊັ່ນ: Apache Maven ຫຼື Apache Ant ການກໍ່ສ້າງລະຫັດ. Annotations can be useful for build tools. When the build tools go about their tasks which include generating source code, generating XML files (e.g. deployment descriptors), packaging codes and files into a JAR file, it looks for the annotations for inputs on generating source code or files.
- Providing instructions to the software runtime
It is possible to define annotations for providing inputs to software runtime although such annotations can be accessed with Java Reflections, a different tool.
Annotations can be both predefined and custom. While custom annotations can be of many types, predefined annotations are of the following three types.
@Deprecated annotation indicates that a class, method or field that is no longer in use.
@ ລົບລ້າງການ annotation indicates that a class in a method does not match any method in a superclass. In case of a mismatch, the compiler throws an error.
@SuppressWarnings annotation suppresses warnings thrown by the compiler. For example, if a method calls a deprecated method, the compiler throws a warning. The annotation suppresses such warnings and more.
Creating our first project:
In this section we will create a project by using Eclipse IDE. The code sample will show how annotation works in a real environment. Before moving into hands-on coding we need to complete the installation steps to make the environment ready.
Following are the installation details.
Step 1: Setting up Java development kit
Download JDK from the Oracle site, install and configure it. Then set the PATH and JAVA_HOME environment variables.
Step 2: Setting up Eclipse IDE
Download Eclipse from the official website. Install it and set the PATH variable.
Step 3: Download annotation packages from spring libraries.
In our example we will be using Spring annotation packages. Download org.springframework.context.jar from the above link and put it in the lib folder in Eclipse IDE as shown below.

Spring packages
Figure1: Annotation Jars in lib folder
Now our environment is ready to write Java programs with annotations.
Let us create out first project by using Eclipse IDE.
Create a project in Eclipse and set the package name as com.techalpine.annotation. Under this package create three Java classes as shown below.
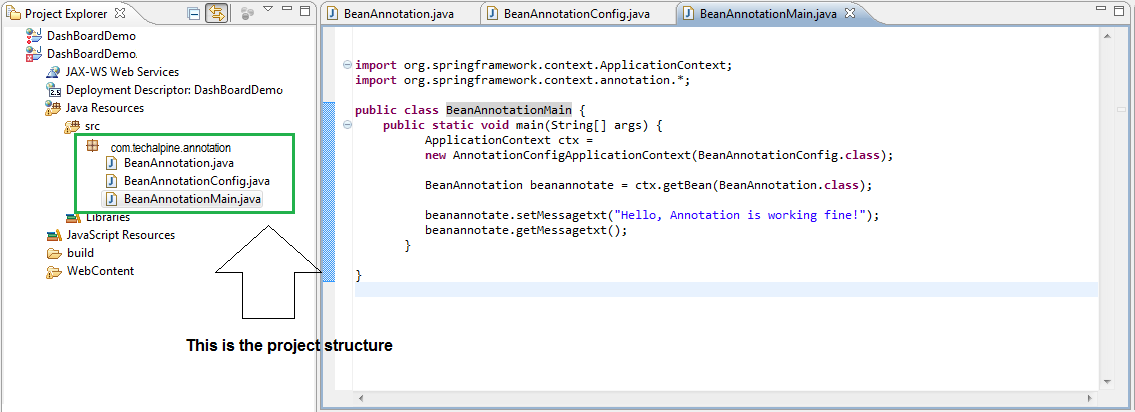
Project Structure
Figure2: Project structure
Three classes are BeanAnnotation.java, BeanAnnotationConfig.java and BeanAnnotationMain.java
Listing1: This is the bean class with getter and setter methods
[ລະຫັດ]
package com.techalpine.annotation;
public class BeanAnnotation {
private String messagetxt;
public void setMessagetxt(String messagetxt){
this.messagetxt = messagetxt;
}
public void getMessagetxt(){
System.out.println(“This is the message : ” + messagetxt);
}
}
[/ລະຫັດ]
Next is the configuration class with @Configuration and @Bean annotations. These annotations will identify the bean and inform the container for binding.
Listing2: This is the configuration class
[ລະຫັດ]
package com.techalpine.annotation;
import org.springframework.context.annotation.*;
@Configuration
public class BeanAnnotationConfig {
@Bean
public BeanAnnotation beanannotate(){
return new BeanAnnotation();
}
}
[/ລະຫັດ]
Next is the main class to test the annotations and how it works.
Listing3: This is the main class
[ລະຫັດ]
package com.techalpine.annotation;
import org.springframework.context.ApplicationContext;
import org.springframework.context.annotation.*;
public class BeanAnnotationMain {
ສາທາລະນະ void ຕົ້ນຕໍ static(ຊ່ອຍແນ່[] args) {
ApplicationContext ctx =
new AnnotationConfigApplicationContext(BeanAnnotationConfig.class);
BeanAnnotation beanannotate = ctx.getBean(BeanAnnotation.class);
beanannotate.setMessagetxt(“Hello, Annotation is working fine!”);
beanannotate.getMessagetxt();
}
}
[/ລະຫັດ]
Executing the project:
The project structure is complete and it is ready to execute. Now run the application as shown below. It will be a stand-alone Java program, so it has to be run as a Java application as shown below.
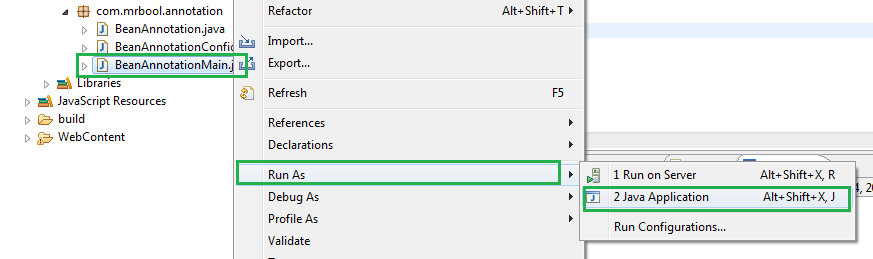
Run application
Figure3: Run the application
Once the main program is executed, it will show the following output.

Output
Figure4: Showing output on the console
ສະຫຼຸບ:
In this article we have discussed the concepts of annotation and how it can be implemented. Hope it will help the users to write Java programs with annotations.