
In this article we will discuss about annotations and how they can be used in practical programming. First, we will discuss some conceptual ideas and then jump into coding to write an example program using annotations.
Motivation:
In Java programming, there are several methods to declare the behavior of different elements (like methods, 클래스, members etc). In most of the cases these declarations are defined in some external files (XML, properties file etc). And then those files are referred in the program to get it executed.
In case of annotation, the approach is totally different. Annotations are meta-data and those are written in a specific format. These annotation elements are written within the Java program itself. So, there is no need to refer any external files, which is a big advantage. 이 통계는 사용하기 쉽고 구현하기에 충분한 유연성.
다음 섹션에서 우리는이 구현 될 수있는 방법을 볼 것이다.
자바 어노테이션은 무엇입니까?
자바 애노테이션은 Java 프로그램의 메타 데이터 인. Or, 간단하게 말하기, 자바 주석 Java 프로그램에 대한 정보를 제공한다. 대부분의 경우에, 이는 직접 또는 프로그램 코드에 영향을주지 않는다.
왜 자바 주석이 사용된다?
자바 주석은 다음과 같은 목적으로 사용할 수 있습니다:
- 컴파일러에 지시 사항을 제공
컴파일러는 기계 판독 가능 명령에 코드를 변환 할 때, 주석은 컴파일러 같은 지침을 제공 할 수 있습니다. Usually, 컴파일 후, 주석 코드에 존재하지 않는.
- 빌더에 지침을 제공
요즈음, 아파치 메이븐 또는 아파치 개미와 같은 도구는 코드를 구축 할 것. 주석 빌드 도구 유용 할 수 있습니다. 빌드 도구가 작업에 대해 이동할 때 발생 소스 코드를 포함하는, XML 파일을 생성 (e.g. 배포 디스크립터), JAR 파일에 코드 및 파일을 패키징, 이 소스 코드 나 파일을 생성에 입력에 대한 주석을 찾습니다.
- 소프트웨어 실행 명령어를 제공
이러한 통계는 자바 반영하여 액세스 할 수 있지만 소프트웨어 실행시에 입력을 제공하기위한 특수 효과를 정의 할 수있다, 다른 도구.
주석 미리 정의 및 사용자 정의 모두 할 수있다. 사용자 정의 주석이 여러 유형이 될 수 있지만, 소정 주석은 다음 세 가지 유형이있다.
@Deprecated 주석은 클래스를 나타냅니다, 사용에 더 이상 방법 또는 필드.
@ 재정의 주석은 메소드의 클래스가 상위 클래스의 임의의 방법과 일치하지 않는 것을 나타낸다. 불일치의 경우는, 컴파일러에서 오류가 발생합니다.
@SuppressWarnings 주석은 컴파일러에 의해 발생 경고를 억제. For example, 방법은 사용되지 않는 메소드를 호출하는 경우, 컴파일러는 경고를 발생. 주석에는 경고 등을 억제.
우리의 첫 번째 프로젝트 만들기:
이 섹션에서 우리는 이클립스 IDE를 사용하여 프로젝트를 생성합니다. 주석이 실제 환경에서 작동하는 방법 코드 샘플을 보여줍니다. 로 이동하기 전에 손에 코딩 우리는 환경을 준비 할 수있는 설치 단계를 완료해야.
다음은 설치 세부 사항은.
Step 1: 자바 개발 키트를 설정
다운로드 JDK 오라클 사이트에서, 설치하고 구성. 그런 다음 PATH와 JAVA_HOME 환경 변수를 설정.
Step 2: 이클립스 IDE 설정
Download Eclipse from the official website. Install it and set the PATH variable.
Step 3: Download annotation packages from spring libraries.
In our example we will be using Spring annotation packages. 다운로드 org.springframework.context.jar from the above link and put it in the lib folder in Eclipse IDE as shown below.

Spring packages
Figure1: Annotation Jars in lib folder
Now our environment is ready to write Java programs with annotations.
Let us create out first project by using Eclipse IDE.
Create a project in Eclipse and set the package name as com.techalpine.annotation. Under this package create three Java classes as shown below.
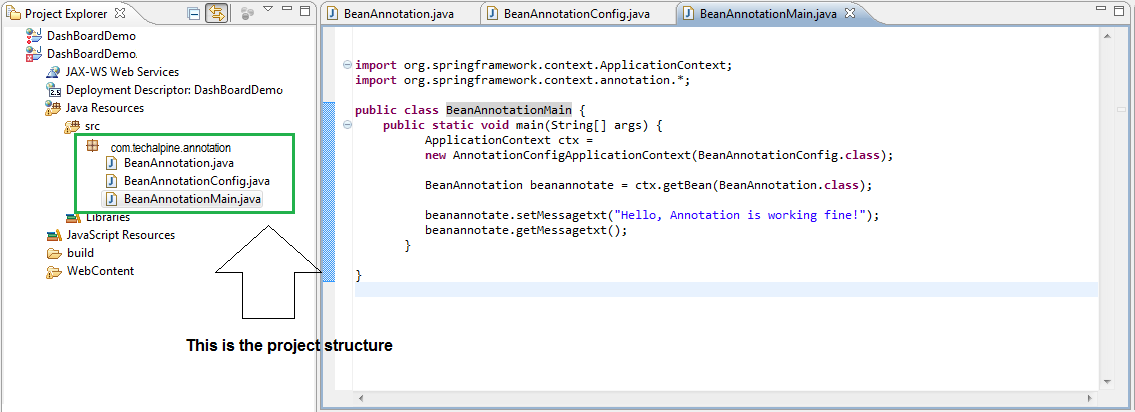
Project Structure
Figure2: Project structure
Three classes are BeanAnnotation.java, BeanAnnotationConfig.java and BeanAnnotationMain.java
목록 1: This is the bean class with getter and setter methods
[코드]
package com.techalpine.annotation;
공용 클래스 BeanAnnotation {
개인 문자열가 messageTxt;
공공 무효 setMessagetxt(캐릭터가 messageTxt){
this.messagetxt =가 messageTxt;
}
공공 무효 getMessagetxt(){
System.out.println(“이 메시지 인 : ” + messagetxt);
}
}
[/코드]
다음 구성 클래스 @ 함께Configuration 와 @콩 주석. 이러한 주석은 빈을 식별하고 바인딩 컨테이너를 알려드립니다.
Listing2: 이 구성 클래스
[코드]
package com.techalpine.annotation;
org.springframework.context.annotation를 가져올 수 있습니다. *;
@Configuration
공용 클래스 BeanAnnotationConfig {
@콩
공공 BeanAnnotation의 beanannotate(){
새로운 BeanAnnotation을 반환();
}
}
[/코드]
다음 주석을 테스트 할 수있는 기본 클래스이며, 그것을 작동하는 방법.
Listing3: 이것은 메인 클래스
[코드]
package com.techalpine.annotation;
수입 org.springframework.context.ApplicationContext;
org.springframework.context.annotation를 가져올 수 있습니다. *;
공용 클래스 BeanAnnotationMain {
공공 정적 무효 메인(끈[] 인수) {
ApplicationContext를 CTX =
새로운 AnnotationConfigApplicationContext(BeanAnnotationConfig.class);
BeanAnnotation beanannotate = ctx.getBean(BeanAnnotation.class);
beanannotate.setMessagetxt(“안녕하세요, 주석이 제대로 작동!”);
beanannotate.getMessagetxt();
}
}
[/코드]
프로젝트를 실행:
The project structure is complete and it is ready to execute. Now run the application as shown below. It will be a stand-alone Java program, so it has to be run as a Java application as shown below.
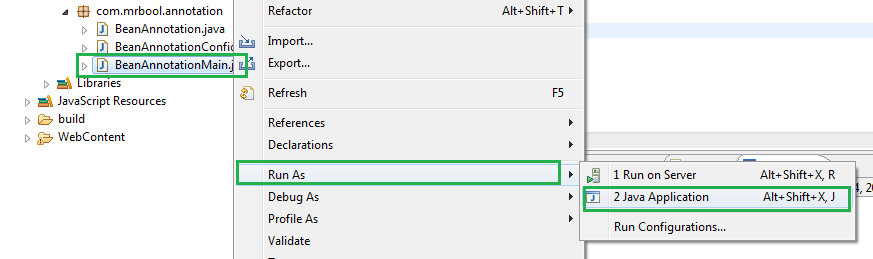
Run application
Figure3: Run the application
Once the main program is executed, it will show the following output.

산출
Figure4: Showing output on the console
결론:
In this article we have discussed the concepts of annotation and how it can be implemented. Hope it will help the users to write Java programs with annotations.