
In hierdie artikel sal ons gesels oor notas en hoe dit gebruik kan word in praktiese programmering. First, ons sal verskeie konseptuele idees bespreek word en dan spring in kodering om 'n voorbeeld program met behulp van notas te skryf.
motivering:
In Java-programmeertaal, Daar is verskeie metodes om die gedrag van verskillende elemente te verklaar (soos metodes, classes, lede ens). In die meeste van die gevalle is hierdie verklarings is gedefinieer in sommige eksterne lêers (XML, eienskappe lêer ens). En dan die lêers word verwys in die program om dit uitgevoer kry.
In die geval van body, die benadering is heeltemal anders. Annotasies is meta-data en dit is geskryf in 'n spesifieke formaat. Hierdie body elemente geskryf binne die Java program self. So, daar is geen rede om enige eksterne lêers verwys, wat is 'n groot voordeel. Hierdie notas is maklik om te gebruik en buigsaam genoeg om te implementeer.
In die volgende afdeling sal ons kyk hoe hierdie geïmplementeer kan word.
Wat is Java body?
'N Java body is 'n metadata van 'n Java program. of, eenvoudig praat, 'n Java body verskaf inligting oor 'n Java program. In die meeste gevalle, dit nie direk invloed op die program of kode.
Hoekom Java annotasies gebruik?
'N Java body kan gebruik word vir die volgende doeleindes:
- Die verskaffing van instruksies aan die samesteller
Wanneer die samesteller vat die kode in masjienleesbare instruksies, notas kan die samesteller sulke instruksies voorsien. gewoonlik, nadat samestelling, die notas is nie teenwoordig in die kode.
- Die verskaffing van instruksies om die bouer
Deesdae, jy sou laat gereedskap soos Apache Maven of Apache Ant om die kode te bou. Annotations can be useful for build tools. When the build tools go about their tasks which include generating source code, generating XML files (Bv. deployment descriptors), packaging codes and files into a JAR file, it looks for the annotations for inputs on generating source code or files.
- Providing instructions to the software runtime
It is possible to define annotations for providing inputs to software runtime although such annotations can be accessed with Java Reflections, a different tool.
Annotations can be both predefined and custom. While custom annotations can be of many types, predefined annotations are of the following three types.
@Deprecated annotation indicates that a class, method or field that is no longer in use.
@ Ignoreer annotation indicates that a class in a method does not match any method in a superclass. In case of a mismatch, the compiler throws an error.
@SuppressWarnings annotation suppresses warnings thrown by the compiler. For example, if a method calls a deprecated method, the compiler throws a warning. The annotation suppresses such warnings and more.
Creating our first project:
In this section we will create a project by using Eclipse IDE. The code sample will show how annotation works in a real environment. Before moving into hands-on coding we need to complete the installation steps to make the environment ready.
Following are the installation details.
Step 1: Setting up Java development kit
Download JDK from the Oracle site, install and configure it. Then set the PATH and JAVA_HOME environment variables.
Step 2: Setting up Eclipse IDE
Download Eclipse from the official website. Install it and set the PATH variable.
Step 3: Download annotation packages from spring libraries.
In our example we will be using Spring annotation packages. Download org.springframework.context.jar from the above link and put it in the lib folder in Eclipse IDE as shown below.

Spring packages
Figure1: Annotation Jars in lib folder
Now our environment is ready to write Java programs with annotations.
Let us create out first project by using Eclipse IDE.
Create a project in Eclipse and set the package name as com.techalpine.annotation. Under this package create three Java classes as shown below.
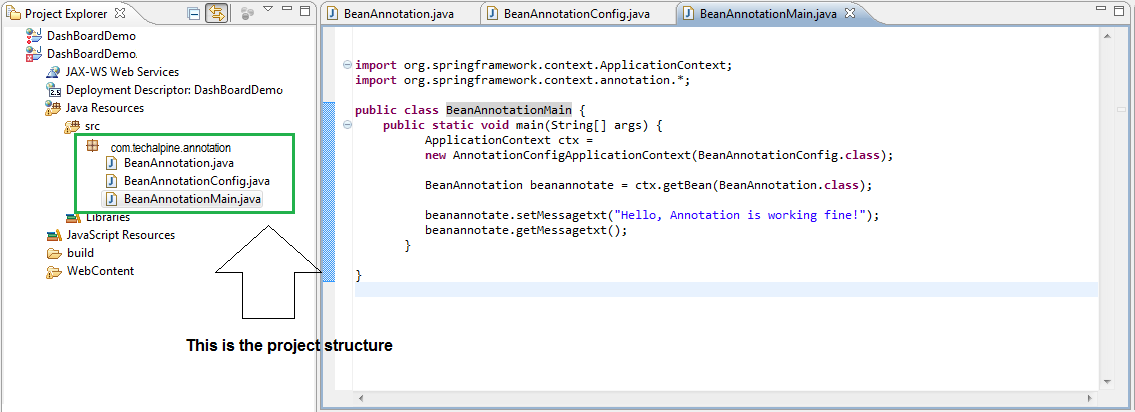
Project Structure
Figure2: Project structure
Three classes are BeanAnnotation.java, BeanAnnotationConfig.java and BeanAnnotationMain.java
Listing1: This is the bean class with getter and setter methods
[kode]
package com.techalpine.annotation;
openbare klas BeanAnnotation {
private String messagetxt;
public void setMessagetxt(string messagetxt){
this.messagetxt = messagetxt;
}
public void getMessagetxt(){
System.out.println(“Dit is die boodskap : ” + messagetxt);
}
}
[/kode]
Volgende is die opset klas met @Configuration en @Boontjie annotasies. Hierdie aantekeninge sal die boontjie identifiseer en die houer te lig vir binding.
Listing2: Dit is die opset klas
[kode]
package com.techalpine.annotation;
invoer org.springframework.context.annotation. *;
@Configuration
openbare klas BeanAnnotationConfig {
@Boontjie
openbare BeanAnnotation beanannotate(){
terugkeer nuwe BeanAnnotation();
}
}
[/kode]
Volgende is die hoofklas om die notas te toets en hoe dit werk.
Listing3: Dit is die hoofklas
[kode]
package com.techalpine.annotation;
invoer org.springframework.context.ApplicationContext;
invoer org.springframework.context.annotation. *;
openbare klas BeanAnnotationMain {
openbare statiese nietig hoof(String[] argumente) {
ApplicationContext CTX =
nuwe AnnotationConfigApplicationContext(BeanAnnotationConfig.class);
BeanAnnotation beanannotate = ctx.getBean(BeanAnnotation.class);
beanannotate.setMessagetxt(“Hello, Body is fyn werk!”);
beanannotate.getMessagetxt();
}
}
[/kode]
Uitvoering van die projek:
The project structure is complete and it is ready to execute. Now run the application as shown below. It will be a stand-alone Java program, so it has to be run as a Java application as shown below.
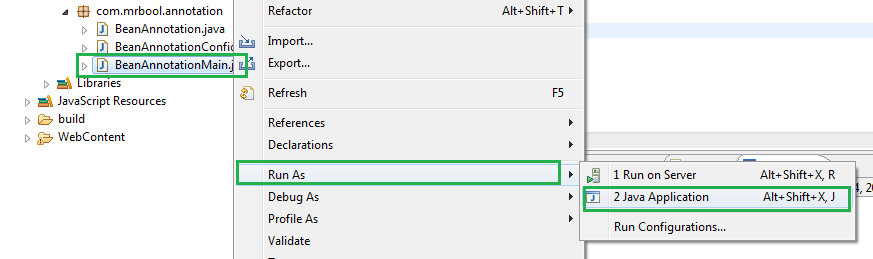
Run application
Figure3: Run the application
Once the main program is executed, it will show the following output.

Uitgawe
Figure4: Showing output on the console
Gevolgtrekking:
In this article we have discussed the concepts of annotation and how it can be implemented. Hope it will help the users to write Java programs with annotations.