Forbhreathnú: Gradle is an automated project building tool which uses the concepts of both Apache Ant and Apache Maven. Gradle is based on a domain specific language rather than the traditional XML approach used by Apache Ant and Apache Maven. Gradle is designed to support multi project builds which are quite large and it becomes a tedious job to be managed via Ant or Maven.
In this article I will talk about the concepts of Gradle as a project building tool and also show how to configure and build a sample java project using this.
Réamhrá: Gradle is an automated build tool which can be used to automate the process of building, testing, publishing, deploying, generating API documentations etc.
Features: Gradle comes with following list of features:
- Declarative build – Gradle provides declarative language elements which we can be assembled as per our choice. This declarative language is extensible which enables us to add our own new language or enhance the existing one. These elements also provide build by convention support for Java, Groovy and other modern Java based technologies.
- Language for dependency based programming – The declarative language is very much flexible and enables Gradle to support the specific requirements.
- Structure the build – Gradle allows us to apply common design principles to our build which enables us to create a structured build for our applications.
- Scalability – Gradle has the ability to easily scale from a simple single project build to a huge enterprise multiproject build. It enables the incremental build and also has the ability to tackle the performance issues which normally large enterprise build scripts have.
- Multiproject support – Gradle supports multi project builds. It enables us to maintain the relationships among different projects in case of a multiproject build environment. It also supports partial builds. We can build a single subproject out of an enterprise application. While building the single subproject, gradle takes care of the other subprojects if the said subproject has dependency on other subprojects.
- Dependency Management – Gradle provides different ways to manage internal as well as external dependencies. It provides supports for all kind of dependency management starting from transitive dependency management having remote access to maven or any other repository and even local file system.
- Integration tool – Gradle can easily import any Ant project and its targets and converts them into native Gradle tasks at runtime. Gradle also provides conversion mechanism to convert the maven pom.xml file into Gradle script.
- Migration – Gradle easily adapts any structure. We can easily develop the Gradle build in the same production branch.
- Groovy Support – Gradle scripts are written in Groovy and not XML based.
Gradle Architecture: Following diagram shows the architecture components of Gradle build tool.
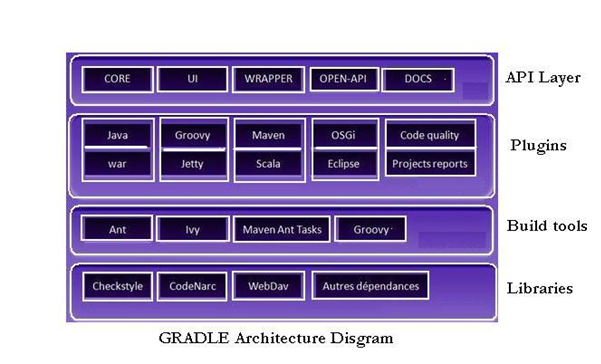
Gradle Architecture
Installation and How to use:
Gradle comes in a zip bundle and can be downloaded from http://www.gradle.org/downloads. On the website, you can find three downloadable files –
- gradle-<VERSION>-all.zip – This bundle contains all components including binaries, source and documentation.
- gradle-<VERSION>-bin.zip – This bundle contains only the binaries.
- gradle-<VERSION>-src.zip – This bundle contains only the source files.
As a beginner, my advice is to download the gradle-<VERSION>-all.zip file. Unzip this bundle on your UNIX system and append the bin folder to the path.
Use the following steps to complete the installation:
As a prerequisite install JDK 1.5 or higher. Groovy library comes with the Gradle bundle so no need to install Groovy separately.
- Download Gradle distribution from http://www.gradle.org/downloads
- Gradle distribution comes as a ZIP file. Unpack the distribution.
- Add GRADLE_HOME/bin to your PATH environment variable. Till this point is sufficient to run Gradle.
- Run Gradle via the gradle command. Check Gradle installation by using gradle -v command. It will display Gradle version and other details.
To test the installation, simply type ‘gradle’ on your terminal, you should see the following output:
Listing1: Sample showing testing the installation
[Code]
: help
Welcome to Gradle <version>.
To run a build, run gradle <task>…
To see a list of available tasks, run gradle tasks
To see a list of command-line options, run gradle –help
BUILD SUCCESSFUL
Total time: 3.135 secs
[/Code]
Once we are done with the installation, to check this, let us create a sample java project which has a simple java class as under –
Listing2: Sample showing simple Java application
[Code]
package com.home.gradletest;
poiblí rang MyGradleSample {
poiblí statach neamhní príomh-( Teaghrán[] comhbhrí leis an rogha ) {
Córas.amach.println( ” Hello Every one . ” );
Córas.amach.println( ” If you can see this output , it means that your gradle installation is successful ! ” );
}
}
[/Code]
In order to run gradle you should have a ‘build.gradle’. If you don’t have this file, still you can check what tasks are available for the project. Simply type the following –
Listing3: Sample showing available tasks
[Code]
gradle tasks
[/Code]
You should see the following output –
[Code]
:tasks
== All tasks runnable from root project
== Build Setup tasks
setupBuild – Initializes a new Gradle build. [incubating]
wrapper – Generates Gradle wrapper files. [incubating]
== Help tasks
dependencies – Displays all dependencies declared in root project ‘gradletest’.
dependencyInsight – Displays the insight into a specific dependency in root project ‘gradletest’.
help – Displays a help message
projects – Displays the sub-projects of root project ‘gradletest’.
properties – Displays the properties of root project ‘gradletest’.
tasks – Displays the tasks runnable from root project ‘gradletest’.
To see all tasks and more detail, run with –all.
BUILD SUCCESSFUL
Total time: 2.667 secs
[/Code]
To start with let us create a simple build.gradle file as under –
Listing4: Sample showing build.gradle file
[Code]
apply plugin: ‘java’
apply plugin: ‘eclipse’
// tag::repositories[]
repositories {
mavenCentral()
}
// deireadh::repositories[]
// tag::jar[]
jar {
baseName = ‘gradletest’
version = ‘0.9’
}
// deireadh::jar[]
// tag::dependencies[]
dependencies {
compile “joda-time:joda-time:2.2”
}
// deireadh::dependencies[]
// tag::wrapper[]
task wrapper(type: Wrapper) {
gradleVersion = ‘<INSTALLED VERSION OF GRADLE>’
}
// deireadh::wrapper[]
[/Code]
The above gradle file is a very basic one. Now if we run the ‘gradle task’ command again, we can see a list of tasks available to build the project, create javadocs etc. Here we will use the ‘gradle build’ task more frequently. This task is responsible for –
- Compiling the source code
- Running the test classes
- Assembling the code in a jar or a war file.
Once the build task is executed, and we see ‘BUILD SUCCESSFUL’ message we can see several folders being added inside the build folder. The most common ones are as under –
- Classes – This contains the class files of the project.
- Reports – This contains the reports generated by the build e.g. junit reports (if any)
- libs – This contains the assembled project libraries (usually jar or war files).
Now let’s go inside the above script
- The first couple of line mentions the plugins that we need during the build process.
- Next part is the repositories. This is the location where we include the third party libraries. Once declared, we are ready for the third party libraries. Here we are using the joda time library version 2.2 of the joda time group. This is explained in the dependencies block. Other important dependencies are
- providedCompile – This includes the dependencies used for compiling the project.
- testCompile – This includes the dependencies used for compiling and running the test cases of a project.
- In the last block we specify the name of our jar file along with its version.
Summary: In this article we have seen that Gradle has strong and flexible conventions to follow. It provides enterprise level controls and the builds are also manageable. Let us conclude our discussion in the following bullets –
- Gradle is an open source build tool.
- Gradle combines the concept of both Apache Ant and Maven.
- Gradle comes with a list of features as explained above.
- Gradle is very simple to install and use.