
Spring MVC Application – How to write the code?
概观:
In the present era of web application development, there are plenty of Model-View-Controller frameworks for Java. Most of these frameworks also integrate with Spring. 但, the best of such integrations happen with Spring’s very own module for MVC. As far as development of enterprise applications is concerned, the Spring Framework is undoubtedly the best option for several businesses. The primary reason for this is the lightweight nature of Spring, something that outdoes the Java Enterprise Edition platform. It is also transparent. So, the use of Spring MVC for the development of Web applications can help you in leveraging several benefits.
In this article, we will try to explore different aspects of Spring MVC framework along with some practical coding examples.
Spring MVC framework
As already mentioned, the Spring MVC framework is known to offer a model-view-controller architecture that is meant for the development of applications that are both flexible and loosely coupled. The MVC model separates the application into three major parts – input, business and UI.
Model – This is made up of the application data and the objects with which they react.
View – This visualizes the model data and mostly made up of the HTML code that a browser can interpret.
Controller – The controller is meant for the processing of requests, following it up with the model build-up and then passing it to the view for display.
Spring MVC Architecture
Spring promises to be a one-stop solution for all your enterprise applications. Keeping in line with this, it offers about twenty modules that may be picked as per your requirements.
Core Container Layer
- This module consists of some of the primary parts and has the IoC (Inversion of Control) and Dependency Injection features.
- There is a Bean module that offers an implementation of a factory pattern.
- The Context module is built atop the Core and Beans modules and is the means to access defined and configured objects.
- The SpEL is another part that allows the querying and manipulation of object graphs at runtime.
Data Access Layer
- The JDBC module offers an abstraction layer that helps you avoid tedious coding.
- ORM is meant to serve integration purposes for object-relational mapping APIs like Castor, XMLBeans, XStream, 等等.
- There is a Java Messaging Service module for the production and consumption of messages.
- The Transaction module is for the management of programmable and declarative transaction classes.
Web Layer
- The Web module is responsible for providing web-oriented features. These include the likes of initialization of IoC containers, multi=part file upload, 等等.
- The Web-MVC module has Spring’s model-view-controller for web applications.
- The Web-Socket module offers two-way communication between the client and server side, based on WebSockets.
- The Web-Portlet module is known to offer MVC implementation in a portlet environment and offers similar functionalities like the Web-Servlet module.
Miscellaneous Layers
- There is an AOP module for the implementation of aspect-oriented programming. One can define pointcuts and method interceptors to decouple and separate functionalities.
- The Aspects module is meant for integration with AspectJ. AspectJ is a powerful AOP framework.
- The Instrumentation module is meant to offer support for class instrumentation and class loader instrumentations that are required in certain application servers.
- The Messaging module offers support for STOMP. It also supports annotation programming model for the routing and processing of STOMP messages.
- The Test unit is for testing out Spring with JUnit and TestNG frameworks.
Spring MVC features
There are two major features that are largely identified with Spring. One of them is the Dependency Injection flavour of Inversion of Control 和另一种是 Aspect Oriented Programming feature.
With the Dependency Injection feature, one can create application classes that are independent of other classes. When writing applications in Java, it is a necessity to have classes that are as independent as possible. This promotes independent testing and the reuse of classes during the unit testing phase of development. DI helps in keeping these classes glued together in a way but also independent of each other.
One very important feature of Spring is its Aspect Oriented Programming framework. In any application, there are various functions that can be found in multiple points of an application. They are known as cross-cutting concerns. These are separate from the application’s business logic and such examples are logging, 安全, declarative transactions, 等等. Aspect is the key unit of modularity in AOP. AOP simply helps in decoupling these cross-cutting concerns from the affected objects.
Lastly, Spring happens to be arranged in a modular fashion. Even though there are plenty of classes and packages, one can pick the ones that are only required for their work.
Environment setup
Setting up the Spring environment involves just four major steps.
- Setting up Java Development Kit
One needs to download JDK from the Oracle site and then, install and configure them. Then the PATH and JAVA_HOME environment variables must be set.
- Installing of Apache Common Logging API
The Apache Commons Logging API can be downloaded from the link http://commons.apache.org/proper/commons-logging/download_logging.cgi.
After downloading, it is important to unpack the binary distribution to a convenient location. Also, make sure that you set the CLASSPATH.
- Setting of Eclipse IDE
Eclipse can be downloaded from the official website. Once downloaded, unpack the binaries and then set the PATH as well.
- Setting up Spring libraries
The Spring libraries may be obtained from http://repo.spring.io/release/org/springframework/spring/. Again, it is important to set the CLASSPATH correctly.
Once you have finished these four steps, you are good to go.
Let’s build the sample application
Now let us try some coding examples to check how different components of Spring MVC application works. In this sample application we will have the following components.
Controller class: This is the controller class of a spring MVC application. It controls all the application flows.
Listing 1: Controller class
package com.dashboardapp.controller;
/**
*
* @author Kaushik Pal
*/
import java.util.List;
import org.springframework.beans.factory.annotation.Autowired;
import org.springframework.stereotype.Controller;
import org.springframework.web.bind.annotation.RequestMapping;
import org.springframework.web.servlet.ModelAndView;
import com.dashboardapp.domain.KoiVoice;
import com.dashboardapp.services.DashBoardService;
import com.google.gson.Gson;
import com.google.gson.JsonArray;
import com.google.gson.JsonElement;
import com.google.gson.reflect.TypeToken;
@Controller
public class DashBoardPageController {
@Autowired
DashBoardService dashboardservice;
@RequestMapping(“/getList”)
public ModelAndView getKoiVoiceList() {
名单<KoiVoice> koivalueList1 = dashboardservice.getKoiVoiceList();
JsonArray koivalueList = null;
//This is for JSON conversion
尝试{
System.out.println(“Inside JSON ********”);
Gson gson = new Gson();
JsonElement element = gson.toJsonTree(koivalueList1, new TypeToken<名单<KoiVoice>>() {}.getType());
koivalueList = element.getAsJsonArray();
System.out.println(“Json array :”+ koivalueList);
System.out.println(“end JSON ********”);
}
抓(Exception e)
{
System.out.println(“exception *************** :”+和);
}
return new ModelAndView(“koivalueList”, “koivalueList”, koivalueList);
}
}
Service class: This class is responsible to get the relevant data from the DAO layer for various needs. Here we are retrieving some specific values only.
Listing 2: Service implementation class
package com.dashboardapp.services;
/**
*
* @author Kaushik Pal
*/
import java.util.List;
import org.springframework.beans.factory.annotation.Autowired;
import com.dashboardapp.dao.KoiVoiceDao;
import com.dashboardapp.domain.KoiVoice;
public class DashBoardServiceImpl implements DashBoardService {
@Autowired
KoiVoiceDao koivoicedao;
@覆盖
public List<KoiVoice> getKoiVoiceList() {
return koivoicedao.getKoiValueList();
}
}
Domain class: This is basically classes having getter and setter methods for various domain objects.
Listing 3: Domain class
package com.dashboardapp.domain;
/**
*
* @author Kaushik Pal
*/
public class KoiVoice {
private String service;
private String category;
private String region;
private String kqivalue;
public String getService() {
return service;
}
public void setService(String service) {
this.service = service;
}
public String getCategory() {
return category;
}
public void setCategory(String category) {
this.category = category;
}
public String getRegion() {
return region;
}
public void setRegion(String region) {
this.region = region;
}
public String getKqivalue() {
return kqivalue;
}
public void setKqivalue(String kqivalue) {
this.kqivalue = kqivalue;
}
}
Dao class: This is the data access layer to interact with the data base. Here we have used some predefined data to make the sample program easy to understand.
Listing 4: DAO class
package com.dashboardapp.dao;
/**
*
* @author Kaushik Pal
*/
import java.text.DateFormat;
进口java.text.SimpleDateFormat中;
import java.util.ArrayList;
import java.util.List;
import javax.sql.DataSource;
import org.springframework.beans.factory.annotation.Autowired;
import org.springframework.jdbc.core.JdbcTemplate;
import com.dashboardapp.domain.KoiVoice;
import com.dashboard.jdbc.DBRowMapper;
import java.sql.Connection;
import java.sql.DriverManager;
import java.sql.ResultSet;
import java.sql.SQLException;
import java.sql.Statement;
import java.sql.Timestamp;
import java.util.Properties;
public class KoiVoiceDaoImpl implements KoiVoiceDao {
@Autowired
// DataSource dataSource;
public List<KoiVoice> getKoiValueList() {
List koivalueList = new ArrayList();
KoiVoice koivoice = new KoiVoice();
koivoice.setCategory(“总体”);
koivoice.setKqivalue(“69”);
koivoice.setRegion(“All”);
koivoice.setService(“Mobile Voice”);
koivalueList.add(koivoice);
return koivalueList;
}
}
Spring configuration xml: This is the spring configuration file for identifying different components of the application and their mapping.
Listing 5: Spring-servlet.xml file
<?xml version=”1.0″ encoding=”UTF-8″?>
<beans xmlns=”HTTP://www.springframework.org/schema/beans”
xmlns:xsi=”HTTP://www.w3.org/2001/XMLSchema-instance” xmlns:p=”HTTP://www.springframework.org/schema/p”
xmlns:context=”HTTP://www.springframework.org/schema/context”
xmlns:mvc=”HTTP://www.springframework.org/schema/mvc”
xsi:schemaLocation=”HTTP://www.springframework.org/schema/beans
HTTP://www.springframework.org/schema/beans/spring-beans-3.0.xsd
HTTP://www.springframework.org/schema/context
HTTP://www.springframework.org/schema/context/spring-context-3.0.xsd
HTTP://www.springframework.org/schema/mvc
HTTP://www.springframework.org/schema/mvc/spring-mvc-3.0.xsd”>
<!– telling container to take care of annotations stuff –>
<背景:annotation-config />
<!– declaring base package –>
<mvc:annotation-driven/>
<背景:component-scan base-package=”com.dashboardapp,com.dashboard,com.dashboardapp.controller” />
<!– adding view resolver to show jsp’s on browser –>
<bean id=”viewResolver”
class=”org.springframework.web.servlet.view.InternalResourceViewResolver”>
<property name=”viewClass” value=”org.springframework.web.servlet.view.JstlView” />
<property name=”prefix” value=”/WEB-INF/jsp/” />
<property name=”suffix” value=”.JSP” />
</bean>
<!– declare beans – More beans will be added here –>
<bean id=”koiVoiceDao” class=”com.dashboardapp.dao.KoiVoiceDaoImpl” />
<bean id=”dashboardservice” class=”com.dashboardapp.services.DashBoardServiceImpl” />
<!– declare datasource bean – This is sample code by using mysql database –>
</beans>
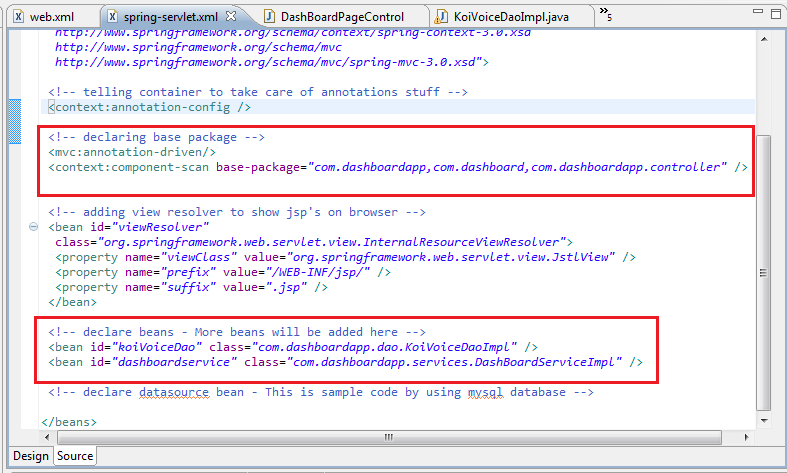
图像 1: Spring configuration file
Web configuration xml: This is the web configuration file.
Listing 6: web.xml file
<?xml version=”1.0″ encoding=”UTF-8″?>
<web-app xmlns:xsi=”HTTP://www.w3.org/2001/XMLSchema-instance”
xmlns=”HTTP://java.sun.com/xml/ns/javaee” xmlns:web=”HTTP://java.sun.com/xml/ns/javaee/web-app_2_5.xsd”
xsi:schemaLocation=”HTTP://java.sun.com/xml/ns/javaee http://java.sun.com/xml/ns/javaee/web-app_2_5.xsd”
id=”WebApp_ID” version=”2.5″>
<display-name>DashBoardDemoIBM</display-name>
<welcome-file-list>
<welcome-file>index.jsp</welcome-file>
</welcome-file-list>
<servlet>
<servlet-name>spring</servlet-name>
<servlet-class>org.springframework.web.servlet.DispatcherServlet</servlet-class>
<load-on-startup>1</load-on-startup>
</servlet>
<servlet-mapping>
<servlet-name>spring</servlet-name>
<url-pattern>/</url-pattern>
</servlet-mapping>
<servlet-mapping>
<servlet-name>default</servlet-name>
<url-pattern>*.css</url-pattern>
</servlet-mapping>
<servlet-mapping>
<servlet-name>default</servlet-name>
<url-pattern>*.png</url-pattern>
</servlet-mapping>
<servlet-mapping>
<servlet-name>default</servlet-name>
<url-pattern>*.js</url-pattern>
</servlet-mapping>
</web-app>
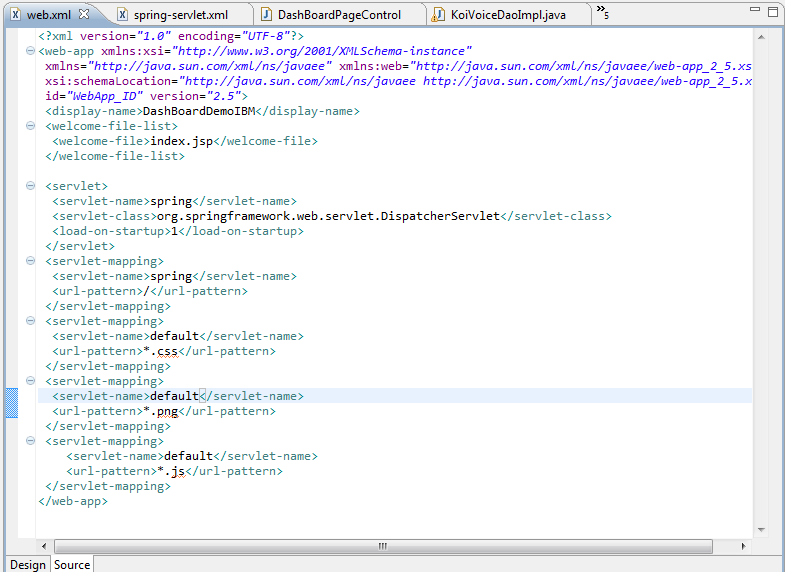
图像 2: Web.xml file
现在, run the application and you will get the following output on the console.
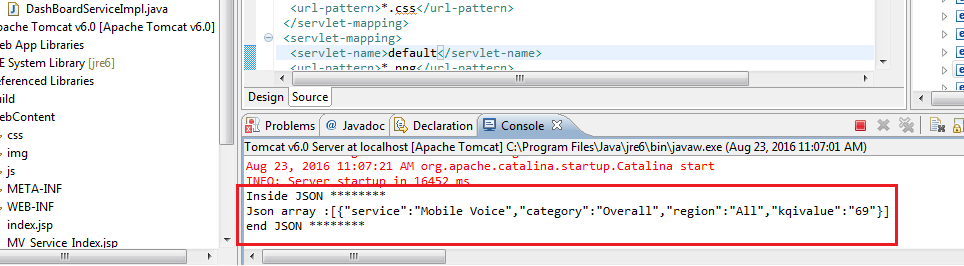
图像 3: Showing output on the console
结论:
Spring MVC is a highly powerful framework that can be used for developing web applications based on model-view-controller model. Although there are other MVC frameworks available in the market, but Spring MVC is the most popular one and widely used. This tutorial gives a fair idea about the framework and its code implementation. Hope it will help developers to gain expertise and work confidently with Spring MVC framework.